Video Tutorial 1 – simple time-lapse
Video Tutorial 2 – simple motion detection
SkyStudioPro Manual
This page shows all the settings and how to use them best. If you have any questions, please contact me.
Capture devices
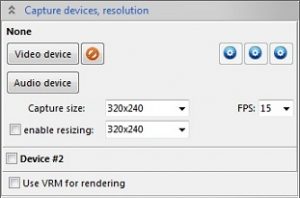
- select video device, any Windows device, capture card or webcam will do
- select audio device, not really needed for time lapse video
- video capture dialog to access your driver settings
- audio capture dialog to access your driver settings
- capture size, e.g. 640×480
- capture resizing, allows you to take huge frames from your webcam and resize them on the fly for better sharpness.
- FPS: frame rate, allows you to take slow shots from webcams, will enhance light quality at night. Lower frame rate means more light
- Device #2: allows you to setup a second capture device and place its video next to or below Device #1
- Use VRM for rendering: Uses the Virtual Render Manager for the video window.
Notes: All settings are stored per video device. Changing the video device will open its codec, time-lapse and motion settings.
The recorded avi will have either the selected captured frame size, OR if resize is checked, the resized frame size.
Saving, recording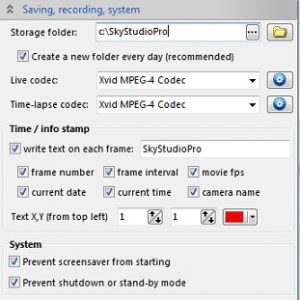
- Storage folder: root dir for saving movies and snapshots.
- Create a new folder every day: Automatically stores movies in daily sub folders.
- Live codec: codec used for live capture.
- Time-lapse codec: separate codec can be selected for time-lapse movies. Use as high as possible quality here. Personally I favor FFDShow codec at 95% quality. It produces relatively small movies in size, with good quality & sharpness.
- Config buttons open the codec config dialog.
- Prevent screensaver from starting: will prevent the screensaver from taking over as long as the program is running.
- Prevent shutdown or stand-by mode: will keep your PC awake as long as the program is running. Manual shutdowns will not be prevented.
Notes: live video recording uses lots of cpu, make sure your codec is suitable for live recording. Time-lapse codec quality can be set to maximum, because it is not real-time.
Time-lapse
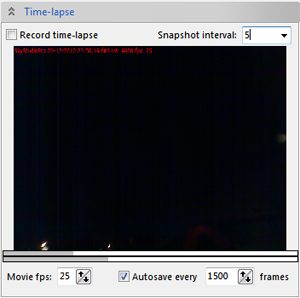
- Recording: check to record, uncheck to stop recording.
- Movie fps: the final avi will run at this frame rate. Recommended: 25fps.
- The preview display shows how your time lapse will look. Click to pause/resume.
- Below are two bars: the upper shows current playback, the lower shows current frame being recorded.
- Current date/time, frame rate and frame number is added to each frame (top left).
Snapshot interval: gap between each frame taken from your capture device. 5 sec means every 5 seconds a snapshot is taken and added to the movie. - Auto-save: saves the movie and starts a new one after x frames. Purpose: if your pc crashes for whatever reason, you’ll still have most of your movie.
Notes: With a 1 sec interval and 25fps, your final movie will be 25x faster than reality, playing 25 seconds of real captured time per second in the final movie. With a 5 sec interval and 25fps, your final movie will be 125x faster than reality and so on. You can change the fps during recording, but it will only have effect on the next recorded movie. At the start of every recording, the frame size and fps of the recorded video is set, and does not change during recording